Tuesday, September 10, 2013

The Little Red Rocker

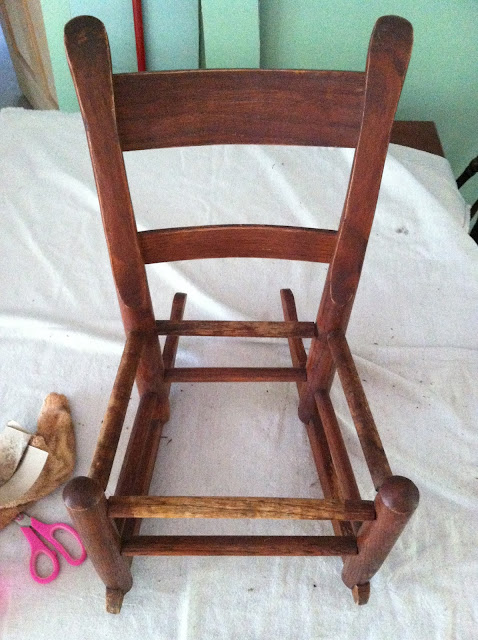
Remember yesterdays tease with the messed up child's rocker. Just in case you missed it here it is again:


It's sad right? So the first thing I had to do was get the old woven seat off. I just used scissors and cut it at both on all four sides. It was very brittle and smelled funky, I threw it into the fire pit when I was done, it's so dry it should make fantastic kindling to start our next fire.
 
 
Then I washed the chair down, just having the seat off and a good cleaning the little rocker was already looking better!
 
 
This was going to be the piece I did two colors on and then wet distressed to show the color underneath. Yea, things didn't work out that way. I put my first coat of Valspar's Ultra paint + primer in Cooper Molera Fandango Red on the chair and loved it. The paint went on sort of thin and the wood grain showed through the paint, and I just loved the look.


I'm not sure this is something I love about the paint on other projects but for this one it worked. It also contrasted great with the fabric I had picked out for the seat. I bet you all wondered what I was going to do for that. I rewove it, only out of fabric this time instead of fire kindling.

The base color of the fabric is blue, it just looks white in some of the pullbacks.
 
Actually before I put the seat on though I waxed the chair with Fiddes and son was in Rugger Brown, it gave it nice shine and a soft smooth to the touch finish.
 
 
Here is the before and after photos together, and edited with a little snapsead, because they are cell phone photos and I'm slightly addicted to snapsead.
The colors were hard to capture with the cell phone so I may need to reshoot with the canon. Unfortinatly all my in house models are much to big for this little chair. If it's not sold before I finish the child's table and chair set I'm working on next maybe I'll borrow a smaller sized model. :)
 
Until next time,
 
Happy painting!
D.
 

Monday, September 9, 2013

The Paris Trunk

A couple of weeks ago I scored two old trunks off Craig's list for $20 each. Right away Chloe told me I had to keep one of them and I wasn't allowed to paint it. I don't have any current photos of that one, it's going to be a winter project, but this story is about the other one anyway. This one:


And her insides were just as pretty:


I had a couple inspiration pieces in mind for doing an old trunk like this. One was this trunk from Ava Blake over at Ava Blake Creations:


And the other one was this one:


From In The Fun Lane although when I saw it on Pinterest I thought it was white, and I liked the idea of an all white trunk, but if you read the blog it's actually grey. Oh well, it was still my inspiration piece. :)

So here's how I combined these two ideas, and I would show you a really fancy photo here, but when I took my fancy photos I forgot to take a really good shot of the top of the trunk, so you get a cell phone shot:


I used two coats of Kiltz white primer for the body of the trunk. The graphics came from The Graphics Fairy and were done using black craft paint. I did end up using the same address as Ava did, which I didn't want to, but I needed the short, long, short line of it to fit between the leather parts. I looked all over the graphics fairy and just couldn't find one that fit as well. I don't have the link to the actual graphics I used but the date/address came from an old wheat sack graphic and the stamp came from a group of Paris graphics, so maybe that will help you find them in a search if you are looking.  Then the peanut gallery chimed in and said that I should have left the metal pieces alone or paint them silver - yea, no. I did paint them a metallic white though and the peanut gallery was happy.

Here's a pretty photo of it at my neighbors pond.


And here is the inside:


I spent $14 extra to have that over sized print done at Office Max, I just knew I wanted it in there. I got it at Agence Eureka, I love that blog, I can't read a thing on it but it's a fantastic spot to get vintage French graphics.

I decided I could probably make a fast sell of it if I advertised it to photographers. I knew it would make a great prop and has the added benefit of being able to be used as a furniture piece like a coffee table, and hold other prop storage, like all those baby blankets! So I grabbed one of my models children and made her come down to the pond with me. See this is how we get to the pond:


Here are a couple of shots we took for advertising:


It sold an hour after posting it.

BTW this is my youngest daughter, my oldest said she's not going to pose for me on my furniture pieces for my blog. She says that makes her the prop and she wants to be the center of attention. Isn't that funny, true, but still funny.

Also did you notice that my daughters fingernail color changed between the two photos of her, we didn't have time before I lost light to take the polish off, but I did not want that ugly green distracting from her face, got to love photoshop!

So that's my Paris trunk flip.

Now I'm waiting for paint to dry on this child's rocker.


It's a mess, but don't worry I have a plan.

I'll show you next time. :)

Until then, happy painting!
D.

Saturday, August 17, 2013

Compass Rose Table

I'm blogging from my phone again. I know it's crazy, but its easier to get to the photos I take with my phone this way. Oh yea, I put the big gun back away so you all ate stuck with cellphone photos again.

So here is the before photo of the table I decided to redo. 


We bought it new 10 years ago. Back then the girls would fight endlessly over who got to sit next to mom. Tired of the fighting every time we sat down to eat, we switched from a small rectangular table to this round one. Now both girls could sit next to me. 

That was 10 years ago, they don't fight over who sits by me anymore. Often times they invite friends over for dinner and we didn't have enough seating at the old round table. 


So I replaced it with an old rectangular claw foot drop leaf, I'll show it to you some day. Today we're talking about the round table. I tried to sell it as is, but no one was interested. So I decided I might as well paint it, if nothing else it will be a learning experience. 

So I stripped and sanded the top. 

Transferred on my graphic using a projector and marker.


Painted my graphics using painters tape on the straight line areas. 


Sanded and distressed the graphic. This is where I learned to never, ever use marker to draw your graphic in, it doesn't sand off as easily as paint.


Then I restrained the table right over the paint. 


I wanted the chairs to be the North, south, east, and west so I started on them next. I sanded them to give them a distressed look and painted on the letter. 


By itself it was fine but I didn't like the way it looked with the table.


I didn't like the white with it. Ok I could fix that. I sanded down all the chairs and painted them black, then added the graphic in white. Much better! 


I also put a letter on the back side if each chair.


So here they are all together with the table.


It was a fun project and I learned a lot. Like black paint collects dust like a magnate. If you paint straight out of a fast drying can of paint your paint will get a thick skin on it that will transfer lumps onto your project. Most importantly I learned I will never, ever paint black paint over curvy white objects again. Every time you think your done you find another white area! 


So there is my before and after of my compass rose table. 

Happy painting,

D.

Tuesday, August 13, 2013

I broke out the big gun.

So as I was working on my little blue table I had a vision. I asked my youngest if she would help me with that vision and she said she would. So I broke out the big gun.

 
I have been taking most my photos with my i-phone lately. I miss the old 5D.


I don't however miss the all the photoshop work.


Ok, so I might miss the photoshop work a little also.

I miss taking photos of people.


But taking photos of inanimate objects has it's own rewards.

Happy shooting,

D.

PS & FYI all photos were taken with a canon 5D and a 24-70 2.8L lens. Shot using aperture priority set at 2.8.

Monday, August 12, 2013

My Granny's Table

 
Before and after of my Grans little side table

I have had this little side table for a long, long time. My grandmother, who we referred to as Granny stripped it years before she died in 2007. When my parents downsized and  moved out of the house they shared with my grandmother they gave her table to me. It has sat in my room next to my bed ever since.


Surprisingly I even have a photo of it in there. Like the rest of the house this room is a work in progress.

Wall paint is Sherman Williams Open Air, I love it!


I gave the piece a light sanding then I stained the whole thing with MinWax Jacobean stain. When it was dry - uh mostly - ok, it might have still been a bit sticky in a few spots! I'm not very patient. I dry brushed it with my own, really crazy mix of paints. I'll give you the top secret formula, are you ready?


The dry brush technique gave a transparency to the paint letting the darkness of the stain and the imperfections of the wood show though.


1/4 cup Kiltz white primer
2 Tbs Dutchboy Platinum (paint + primer) Flat - North Coast
3 tsp ASCP Louis Blue
1/2 tsp Valspar Ultra paint + primer (NEW LABEL!!!) Flat - Lincoln Cottage Black

I told you it was crazy! A much easier way to get this color would be to buy ASCP Duck Egg, but I didn't have any and don't have a retailer anywhere near me, so I used what I had on hand.


I kept the original hardware, but let them soak in some stain to cover some yellow corroded areas.

I used two coats of Fiddes & Son wax in Rugger Brown on the top. I love this wax over dark stain, it just makes it that much richer! It also makes it so soft, I can't help but touch it when I walk by.

MinWax Jacobean stain and two coats of Fiddes & Son wax, look at that shine! You can see the typewriter and silver cup reflecting on the wood.

I'll finish it in a soft wax, but I haven't done that yet. I like to wait a few days to be sure the piece doesn't have anything else to say to me. I haven't decided it I like the blue table against the blue wall yet. Maybe it will change a little more, we'll just have to wait and see.

Here's another look at the before and after photos:


Happy Painting!

D.

Monday, August 5, 2013

The Flip Contest!

Last month I found out my town was having a FLIP contest. Each team had to come up with three items to flip. 1) an item made from pallets 2.) a man cave item and 3) a storage item. We had to keep track of expenses and we had to sell our items on our main street during something our town calls "Market on Central". The winner was the team that made the most income after expenses.

Here is my man cave item and below it I added some photos of what it looked like before we started. 


We decided to do a tailgate bench for out man cave item. The tailgate was the most expensive item I purchased to flip at $40, but we made up for it by using salvaged wood $0. It was the last thing sold, but I already have orders for 2 more, + I want to make one for myself, only I want a blue one. 
 
 
Next up our pallets, I decided to go for a low set coffee table:


If I were making this for myself I would have put it on huge casters, but those casters were $30 each and I got these little ones FREE at a garage sale. I also got the pallets FREE off craigslist. I will probably never ever get to make one for myself though, because my husband says he's never ever going to work with pallets again. It was fun for me to paint and stain though so I had fun with the project. It was the 2nd thing gone and actually sold to the lady in the booth next to us!

Last and most difficult for me was the storage item. I just had so many choices for this one. A vanity, two dressers, a door I could make into a hall tree thingy. I finally decided on the vanity, but I also decided the vanity should be a desk:


It turned out soooo cute! I love the mirror as a chalkboard! 12 hours before the sale started my oldest daughter was telling me to keep it and flip something else! ummm, NO! It was actually in pretty good shape, but I did have to glue two of the drawers. I stripped the top and did a darker stain then painted the rest, distressed and sealed with wax. Clear wax on the painted areas and a dark brown wax on the desk top. I also talked the lady into buying it by promising to go to her home the next day and monogram it for it, that sold it! It was actually the 1st thing to sell in the whole competition.

Guess what?

I WON!!!!!

We made a $222 profit after expenses. I sold everything and I did let them go for a little less then I would normally, but it was a contest and I wanted to win! I won a $500 gift certificate to Lily Grace On Central. Both teams also got $20 gift certificates to a local restaurant, and of course we got to keep any money we made from our sales.

All in all it was a fun event and I would have enjoyed it even if I didn't win. I have already been to Lily Grace and picked up a few new things to flip, maybe I'll even remember to blog about them. :)

Happy painting!

Deanna

Wednesday, July 10, 2013

A Little French Zebra

A year ago I posted about the painted lady, a tall white dresser that took a walk on the wild side.


You can read about that redo here

My daughter fell on love with the painted lady and begged me to keep her. Not only keep her but redesign a whole room around her. Of course there were other rules I had to follow with the room to. It not only had to be zebra to match the dresser but it also had to have Paris in it. She absolutely refused to let me take out her vintage four poster bed that she "helped" me redo when she was in preschool. There had to be a place for her dog, her books and a desk. The desk HAD to be a secretary and had to have a place for her to put her magic potions and fairy dust. Oh yea, she also wanted a chandelier. 

Kids are so much harder to work with once they have an opinion of their own...

Chloe's room is really tiny and hard to put furniture in. To get the most floor space for her the best place for her bed is to have it's side pushed up under the window at the far end of the room. To give you an idea of how small the room is, with her bed pushed sideways up against the wall, centered under the window, there is less then a two foot gap between the wall and her twin sized bed on either end. I really, really wanted to do a built in daybed here. No way, she said. I'm keeping my bed.
 
GRRRRR
 
So the challenge was how to get the built in look I wanted but let her keep her beloved four poster shabby chic bed.
 
The solution:
 

Please excuse the white balance here, it was taken at night with just the overhead lighting.

 
To get the look of a built in daybed I attached a wall to wall valance to the ceiling, hung cutens from either end, and a small plug in chandler from the ceiling above the bed. For the valance the fabric was stapled to a 1x1x8 board that was then screwed into the ceiling with drywall screws. The sides were folded in and then stapled directly to the walls. The trim was put on using double sided fabric tape. One of her favorite parts of a four poster bed was being able to drape it with fabric and create bed 'forts' with it. Did I forget to mention that was also one of the things I had to put into this room?
 
 
Behind the valance the curtains are hung using a wire and wire clips that slide across the wire. This lets Chloe close her bed curtains and hide out in her bed. I often find her bed this way with a couple giggling girls in it when she has friends in it.


Close up of valance trim, Chloe picked out two different trims, you know, cuz one would have been to easy.
 
There are a few other secrets in this room. Remember I had to have a place for the dog? We used a roll out drawer we picked up from IKEA a few years ago. Chloe used to use it to keep toys under her bed. It has been painted and repurposed into a dog bed. She loves having a place for her dog to sleep in her room at night, but able to put the bed away for extra floor space during the day.


My dog Lilly is 'borrowing' Daisy's bed, she HAS to be where I am and she might as well be comfortable while I take photos.
 
Now take a look at the room photo at the top, and compare it to the photo with the dog bed. See the artwork behind the bed? It's her roller shade. I used a sharpie marker and drew this zebra right on the shade. When pulled down it looks like there is framed artwork above her bed instead of window, but when she needs more light in the room she simply pulls the 'artwork' and lets the sun shine in.

It was months before I could find a secretary within my budget. When I finally found one it was in rough cosmetic shape and Chloe hated it. Once it was painted though she decided she loved it.

The shelves hold little apothecary bottles with dragon scales, fairy dust, and potions. (glitter, sequence, and food coloring) 
To keep with our 'hidden suprises' we decided to pop the inside of the desk with a bright pink.

 
She has a little shelf behind the head board end of her bed to put her cell phone, glasses and what ever else the little eccentric thinks she needs. We plan on hanging more shelves or maybe a book shelf on the foot board side of her bed, but haven't gotten to that yet. For now the many books are taking over the drawers of the desk, so this is something I need to get to soon!
 
So there you have it, the gone wild eccentric room of a 10 year old girl the painted lady has moved into.